
XAMPP provides a convenient local server environment for web development. It bundles Apache, MySQL (or MariaDB), PHP, and Perl, simplifying the process of running PHP-based projects and databases locally without manual server configuration. This guide will walk you through everything you need to know.
Why Choose XAMPP?
XAMPP stands out due to several advantages:
- User-Friendly: Its simple installation and operation make it perfect for beginners.
- Cross-Platform Compatibility: XAMPP is available for Windows, macOS, and Linux.
- Comprehensive Components: It includes everything needed to run web applications.
- Free and Open-Source: XAMPP is freely available and doesn’t require any licensing fees.
Installing XAMPP: A Step-by-Step Tutorial
First, download the XAMPP installer:
- Visit the official Apache Friends website (https://www.apachefriends.org/).
- Choose the appropriate XAMPP version:
- The latest PHP version is recommended for new projects.
- Older versions are available for compatibility with existing projects.
- Click the Download button.
Then, install XAMPP on your system:
- Open the downloaded installer file.
- Proceed through the installation wizard:
- Click Next on the welcome screen.
- Select the desired components (leave the defaults if unsure).
- Specify the installation directory (typically C:\xampp).
- Continue clicking Next until the installation begins.
- Wait for the installation to finish, then click Finish.
- After installation, the XAMPP Control Panel should open automatically. If not, you can access it from the Start Menu or the installation folder.
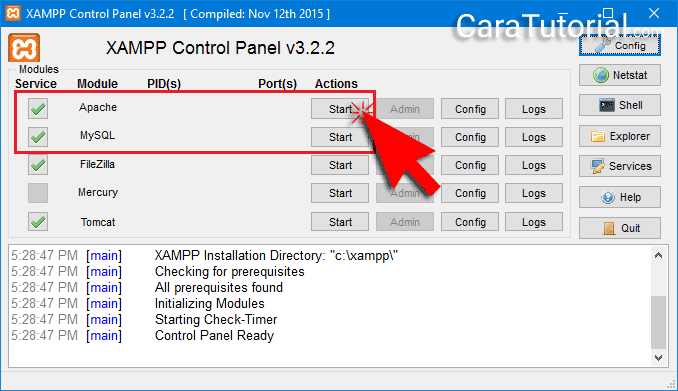
Running XAMPP and Your Projects
To start using XAMPP:
- Open the XAMPP Control Panel.
- Click the Start button next to these services:
- Apache: This starts the web server.
- MySQL: This starts the database server.
- The status will turn green if the services start successfully.
To test your local server:
- Open your web browser.
- Enter http://localhost in the address bar.
- If the XAMPP dashboard appears, the installation was successful.
Finally, to run your PHP projects:
- Place your project files in the htdocs folder (usually located at C:\xampp\htdocs).
- Access your project by typing the URL http://localhost/your-project-folder-name.
Key Features of XAMPP
XAMPP offers a range of useful tools:
- phpMyAdmin: A graphical interface for managing MySQL/MariaDB databases.
- File Transfer: Easily upload and manage files through the htdocs folder.
- Easy Configuration: Access all server settings through the Control Panel.
- Modularity: Add additional modules like Tomcat or Perl.
Tips and Tricks for Using XAMPP
Here are some helpful tips for working with XAMPP:
- Changing the Default Port: If port conflicts occur (e.g., port 80 for Apache), edit the httpd.conf file (in the apache/conf folder). Change the line Listen 80 to Listen 8080 or another available port. For more information on port configuration, see the Apache documentation (Apache HTTP Server Documentation).
- Securing XAMPP: To prevent unauthorized access, enable a password for phpMyAdmin and use a firewall to restrict network access. Refer to the XAMPP security documentation (XAMPP Security) for best practices.
- Backing Up Your Database: Use the export feature in phpMyAdmin to create database backups.
- Using Different PHP Versions: XAMPP supports multiple PHP versions. Download additional versions and adjust the configuration as needed.
Conclusion
In summary, XAMPP is an invaluable tool for web developers, especially beginners. With its straightforward installation and user-friendly interface, you can concentrate on developing applications without worrying about complicated server configurations. Remember to manage your projects effectively and perform regular backups. Fo